Importing Schoolmoney Transactions
The principle of this exercise is broken down into 3 stages:
- Generating a file within SchoolMoney of all the online Transactions that you want to Import
- Checking the file so the data is correct
- Importing the file into Fund Manager
It is important to note that this process can only be used for importing online ePayment and PayPoint transactions. Although Cash and Cheque Transactions can be recorded in SchoolMoney they cannot be Imported into Fund Manager using this process. If you have any Transactions in the file that should not be Imported use the guidelines in stage 2 to remove these Transactions, i.e. Dinner Money that doesn’t belong in School Fund.
Step 1 - Generating a file within SchoolMoney of all the Transactions that you want to Import
- Within SchoolMoney go to basket > Money Received.
- Choose Reports.
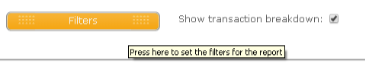
- Tick the ‘Show transaction breakdown’ box and then click>Filter at the bottom
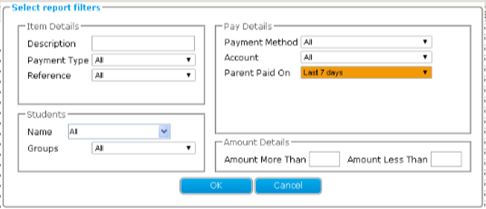
- Choose only ‘Online Transactions’ in ‘Payment Method’ on the right and choose the dates you would like to import
- Click OK
- Click Export
- Choose Pebble from the dropdown
- Choose Bank Account if you have more than one
- Choose Export to your pc - this report will save as a csv
Note: It is your responsibility to handle personal data in accordance with GDPR law.
Step 2 - Checking the file so the data and column headers are correct
Open the csv from the downloaded location. When you initially open the file in Excel you may need to manually edit the file so only the Transactions you want to Import remain.
Note: To remove rows of data you can use the filter option or by selecting the row(s) and right clicking the mouse to select ‘Delete’
- With the csv open right click the column in the box that says ‘Amount’
- Choose Format cells.
- Click Currency > OK
- Save the csv with a name that reflects the dates you are importing to a location you can find easily for the next step.
Step 3 - Importing the file into Fund Manager
Within Fund Manager go to Transactions > Import ePayments.
Always check any Pending Uploads by clicking on this button to ensure that you have no Transactions still waiting to be Imported.
Once satisfied there are no Pending Transactions repeat the process Transactions > Import ePayments.
Upload the CSV file you have just saved by choosing the file and clicking the Upload button.
A list of all the Transactions that you have Imported should appear. From this screen you will need to select from the drop-down list the Account that matches the first Transactions below and the Settlement Account (Support will need to set this up for you if you have no Settlement Account) you wish to allocate the Transactions against.
Work through each of the Transactions selecting the matching Name to the first Account. The closest matching Name should appear at the top of the Names list. Once you have matched all of the Names (or have reached the end of the page) for the first Account click Import.
Note: If the Account does not appear then you may need to Create a New Account via Manage Accounts in Fund Manager, Click>Leave and return to this screen to complete the Import process, Click>View Pending Import
Do each Account (trip/visit/item) at a time, then repeat the process with the different Accounts until you have finished the Import, one page at a time.
Note: You will not be allowed to Import any Transactions that you have not matched or if you have not chosen an Account or Settlement Account to place these against
You can view your Imported ePayments via Transactions > Search Transactions, choosing the ePayment option under ‘Type’.
Once you have Imported your Transactions you will be able to Transfer the total Transaction Amounts you see on your Bank Statements from the Settlement Account to your chosen Bank Account by doing the following;
- Go to Bank & Cash
- Transfer between Bank Accounts
- Transfer from > Settlement Account
- Transfer to > Chosen Bank Account
- Enter amount
- Enter date
- Transfer
You can then ‘Record a Payment’ for the Transaction fees in the normal way via Transactions > Record a Payment.
Warning! If you have already imported a file and have had to navigate away to another screen within Fund Manager do not re-import the file if you wish to return to the import screen. Click View Pending Import and continue from where you left off.